Image Mapped Input
Allows to choose a problem type by putting the pointer on an image. The learner must place the curser (green dot) on the thumbnail image to answer the question.
1. Choose from the list of advanced problems the following component “Image Mapped Input“:

2. Click on « Edit » to set up the problem.

3. An example of a problem already coded displays.
To create an image mapped input problem, you need the following elements:
- The height and width of the image in pixels.
- Coordinate pairs that define the region or regions where you want learners to click.
To collect the information, you need about your image, use an image editing tool such as Microsoft Paint. To specify a rectangular region, you need two coordinate pairs: the upper-left corner and the lower-right corner.
� Note: The coordinate pairs for all images start with (0,0) in the upper-left corner of the image and increase in value toward the lower-right corner, similar to the progression of reading English.
4. In the component editor, replace the example problem text with your own text. But don’t delete what comes after <imageresponse> (see the yellow highlight to delete the right elements).
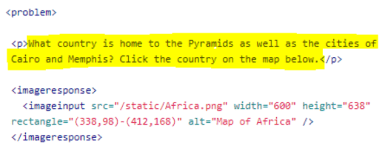
5. In the <imageinput> element, follow these steps:
- Replace the example file path in the src attribute with the file path for your image.
- Include alt text for your image to make the image accessible.
- Replace the example values for the width and height attributes with the dimensions for your image.
- Modify the example rectangle attribute to reflect the shape and size of the region that you want to specify.
6. Click Save.
Learner platform display:
Question: Select the Twitter logo from the group below.

� Note : this activity allows the use of a single curser (green dot).